


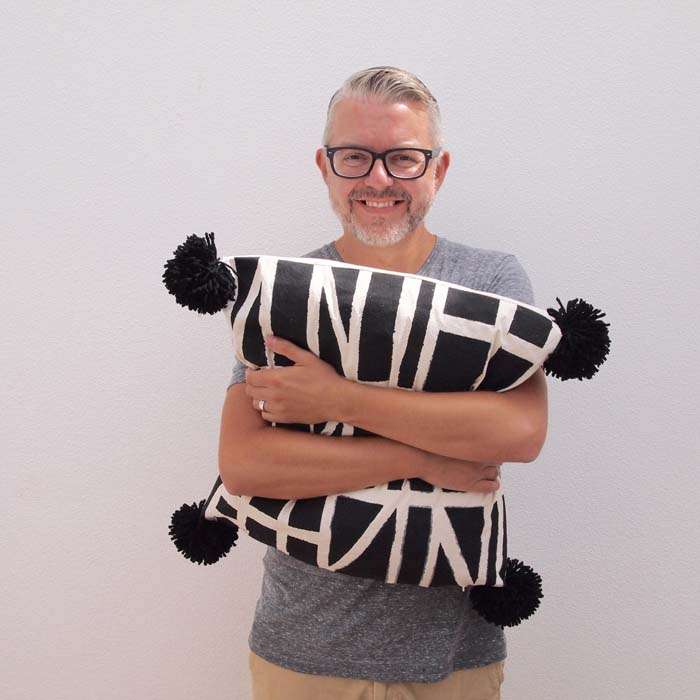
Guest post by Arren Williams
Today we’re thrilled and honoured to have Arren Williams joining us all the way from Portugal with this really rad pillow DIY. Many of you may know Arren from his gorgeous styling, editing and trend reporting skills here in Canada, but now he’s living overseas for a year with his husband in the Algarve; Portugal’s beautiful southern coast. We spotted his graphic black and white pillows he made recently on his Instagram account earlier last month, and we’re thrilled he accepted our invitation to re-create them for a DIY on Poppytalk. Psssst! Stay tuned also as soon we’ll be able to buy Arren’s pillows and some soon-to-be-announced products online later this Fall! Can’t wait! In the meantime, check out his tutorial below on how to make these gorgeous pillows!


Materials List:
Fabric (must be pre-washed, without the use of any fabric softener, dried and ironed)
Fabric Paint
Sponge
Masking Tape (a couple of different widths)
Wool
Needle and thread
Drop cloth
Rubber gloves
How-To:
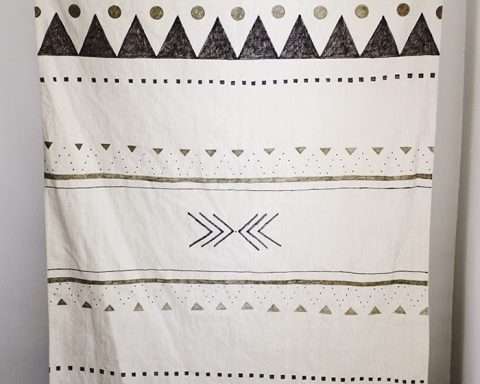
Cut the front panel of fabric for your cushion at least 5cm larger than the finished size to allow for seam allowance when it’s sewn into a cushion cover, and start to plan out your design with masking tape. I’m inspired by 50’s graphic patterns, architectural details, tiles and more, so with that in mind, I’ll start taping away and freehand the design. Using a couple of different widths of tape will make your final design that bit more interesting and, as you go, it’s easy to adjust the tape and reapply to get the design you want, but do make sure it’s firmly stuck to the fabric.

Cover your work surface with a drop cloth and pre-mix your fabric paint. I find it’s too thick out of the package, so I water it down to the consistency of whipping cream. Then don a pair of rubber gloves and get to work – Dip the sponge and try and squeeze off the excess before working on the fabric. Dab away and start to cover your taped design, aiming not to shift the tape as you go!


With the tape in place allow the fabric to dry overnight on a new drop cloth or, in my case, set it to dry in the hot Portuguese sun. Finally the most exciting part – Carefully remove the tape to reveal the finished design. I love the randomness of the final look of the sponged design, and don’t mind a little colour bleeding here of there, or even places where I’ve missed covering the fabric entirely (you have to embrace happy accidents!). To ‘fix’ the design, and make it more durable, iron the reverse of the design on a high setting with steam.

Then sew up your cushion cover or, in my case while I’m living abroad without my machine, take the fabric to a lady called Carla and ask (in very bad Portuguese) to sew the cushion cover up for you. Once that’s all happened, next step is to make your pom-poms! Honestly, your first one will look awful, so make sure you have enough wool around to make at least 5 or 6 as you get more accomplished. Take a look on YouTube for more info, but here’s the bare bones of it – Wrap the wool around the widest part of your hand at least 100 times (less will be too skimpy, believe me on this). Snip and then carefully slide the wrapped wool off of your hand then, with the help of a friend, tie a very tight knot through the centre of the wrapped wool, leaving the ends of your tie nice and long (this’ll come in useful later). Snip through the loops on either side of your knot, and fluff up all of the ends. Yes, it’s ugly, but a bit of time and a haircut with a sharp pair of scissors and you’ll end up with something passably attractive.
Click on the card deck below to see the pom-pom how-to:
To attach your pom-poms to your cushion cover, use the long tails from your tie to discover the knot and stitch through this area to attach it to the corner of the cushion. It’s best to do this without the fill inside the cushion just so your stitches don’t catch the fill as you go. Note: Your pom-poms, though wildly fun and on-trend, do make your cushion not machine washable, so this means from now on it’s spot-clean only for this baby…


Follow Arren on his beautiful instagram account at @arrenwilliams