


We are excited today to share a DIY from Cori Anne of Oh Lovely Bows, a local design student and blogger who caught our eye with this yarn planter project we spotted on instagram a while back. It’s such a great project and we thought our readers would love it, so we asked Cori Anne to do a guest post. Thank you Cori Anne for sharing!
Yarn Planter DIY
We all know how weaving is all the rage these days. But what if some of us don’t know how to weave, or simply don’t have time for a big project? Well, that’s where this DIY can help us! And since most of us like the look of yarn weavings, this seriously easy DIY woven planter is a pretty close second to having a woven piece hanging up in our homes. Let’s get to making!

Supplies:
Yarn & Cording, various colours and thickness
Hot glue gun
Scissors
Embroidery needle
Pot
Plant


How-to:
1 – Heat up the glue gun and pick out what kind of pattern you’d like to do.
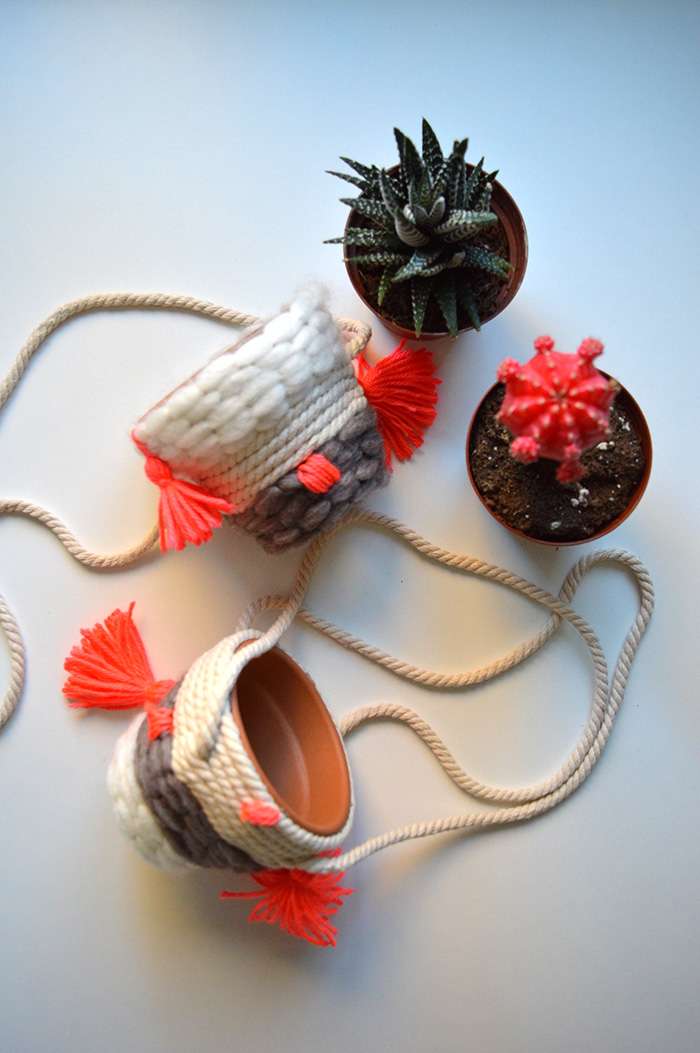
2 – Measure out how long you’d like the cording used for hanging to be. It will depend on how tall your plant is as well as how low you’d like the pot to hang from the ceiling. *On one of mine I did a single piece of cording that attached on opposite sides of the pot, on the other I attached two pieces of cording attaching them on four equal sides of the pot. You can see it more clearly in the photos, if this isn’t clear 😉
3 – Start glueing your decorative yarn around the pot. You’ll want to continually glue all the way around to keep it secure and the rows snug together.
4 – Once you’ve wrapped about a third of the top of the pot with yarn, glue the cording you’ve cut out for the hanging pieces onto the sides of the pot. Then continue to wrap the yarn, covering up the hanging cord as you go along.
5 – Switch up the colour, the texture of the yarn, the placement, the list goes on. That’s the fun part, you get to make it suit your style!
6 – After the pot has been fully covered, add little details. I added a couple of pom-poms and some simple stitches (this is where the embroidery needle will be used) to make it a bit more quirky. The colour pop is awesome! If you have any neon yarn, thread or parachute cord – use it!
7 – Once it’s finished place a plant in it and hang it from your ceiling or wall with an appropriate hook. Done!
**TIP – The pot that has two strands of cording to hang is much more balanced than the one that has a single strand for hanging. Up to you on which look you like, but I definitely will make any future ones with two strands vs one.