


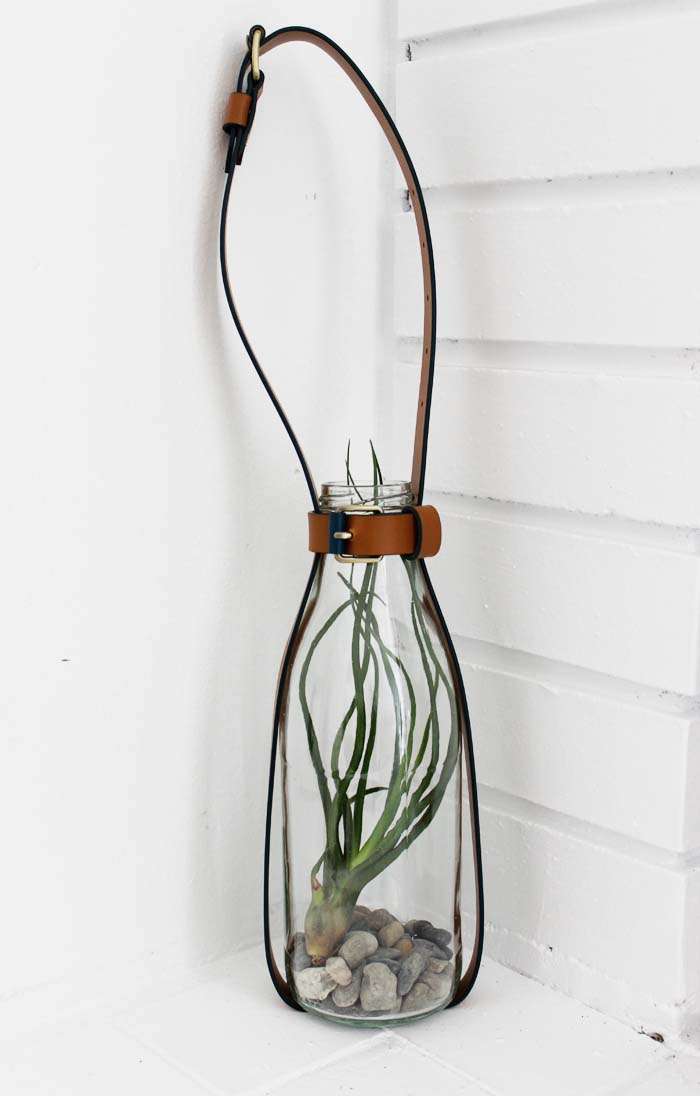
I’ve been saving some pretty cute Italian juice jars recently for a possible project in our future, and finally was inspired. Later last week I saw a hanging lantern (a white glass one with leather straps). And so I thought it would be fun to adapt that idea into a DIY hanging terrarium for our bathroom window. This project could morph into other things of course from a lantern, a flower vase, my son suggested even an aquarium, but an airplant terrarium it is; and it happens to be super easy to make! I love the air plant I found –a long piece to fit easily into the juice bottle. I picked up my air plant at the Prickley Pear (they have heaps) in friendly neighborhood Steveston (or for Once Upon a Time fans – Storybrooke). One could use any jar (mason, milk, etc.) of course; I picked up the skinny belts at H&M –so affordable at $7 for a project like this; but I also ran into some on sale at Joe Fresh (Superstore) for under $5 this weekend (thanks Janis for the tip)!

Materials Used:
Peanut butter (to remove the label)
Jar (milk, juice, mason)
2 skinny belts
an awl (or a similar pointy tool – I’ve even made belt holes with forks in the past in a crunch).
scissors
air plant
pebbles
moss (optional)
crazy glue or strong double sided tape
To start –I cleaned the label off the jar – and was looking for a non-chemical solution to remove the glue/paper off the jar and found an amazing alternative –peanut butter! Yay! Just smear it over the glue part (let sit for a few minutes) – and then scrape off with a butter knife. It was gone in about 3 minutes with a little muscle!

Next –measure your belts. One will be wrapped around the neck of the jar and the other will be wrapped from the bottom up buckling at the top. After you have measured –take the belt pin and mark where you will be wanting to punch your holes for each one. One will be very short, the other longer. Using the awl, push a hole right through the belt to create a new belt hole for each.
Prepare your jar interior. If using as an air plant terrarium, really you don’t need anything but the plant if you like, but I added pebbles for a little interest – and you could also opt for some moss. I ended up passing on the moss, as I was afraid if I didn’t like it – it might be hard to remove (due to the small neck on my bottle).
And then for the final set up. This part is simple really –probably harder to explain than do. But basically start with the neck belt first. Wrap it around and buckle. Then using a scissors, trim the excess left over belt. With the second belt, set the bottom of the jar on the center of the belt and then pull both ends through the inside of the first belt on each side of the jar (you might have to loosen the first belt a bit to do this), and then once pulled through, just buckle up the top and then secure the neck buckle. You can at this point secure the belts a little more to the jar with some crazy glue or a strong double sided tape (on the bottom and sides). Or if you want to make it really sturdy, grab another belt and run it opposite the other. And then – that’s it! Easy yes?


And that is it! A simple and fun-to-make little decor piece to hang in a bath, kitchen or give as a gift! Happy making!