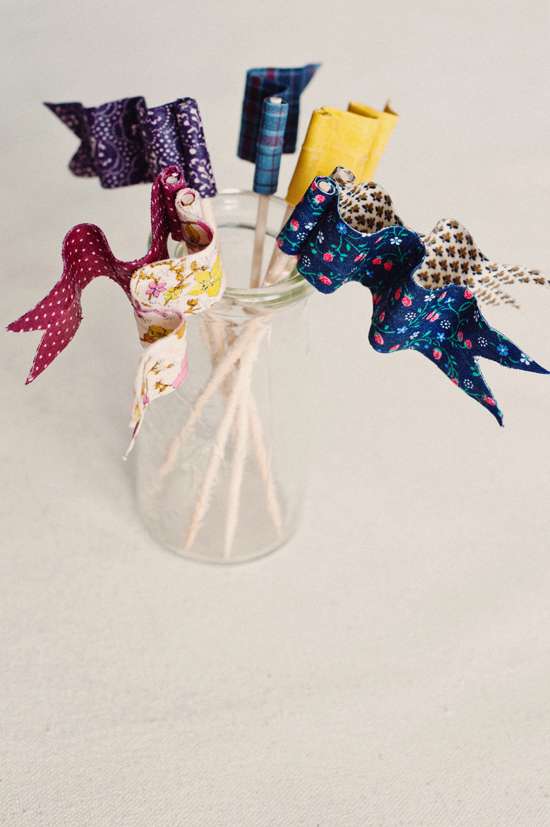
These little flags make a big statement. They can easily be crafted from a mixture of new, vintage, and recycled fabrics. Use them for a specific occasion or have them handy for when guests come over to get a little ‘wow’ out of them. They are fantastic for birthday parties! They can be re-used over and over, and are bendable to create a loose or tight wave

Materials:
– New or scrap pieces of fabric (darker, patterned fabrics work best to hide the wire)
– Scissors
– Masking tape (1″ wide is recommended, but other sizes will do)
– Mod Podge (matte)
– Paintbrush
– Light Crafting Wire (white or silver is best)
– Small dowel (6″ in length is recommended)
– Glue gun (optional)
Instructions:
1. Cut approximately 4.5-6″ of wire. Straighten it out as best as possible, but don’t worry about it being perfect. It will be hidden.
2. Tear a strip of masking tape about the same length as the wire and lay the wire onto the tape down the center. Then tear another strip of tape, again the same length, and cover the wire so that it is sandwiched between the 2 pieces of tape.

3. Using scrap paper or newsprint to protect your work surface, grab your Mod Podge and paintbrush, and coat one side of the taped wire. Lay down a piece of fabric cut slightly larger than your pieces of tape with the edges overlapping so that the excess can be trimmed later. Press it down firmly so that it sticks. Repeat the same process for the other side and allow some time for it to dry.

4. Coat the outside of both sides of the fabric piece with more Mod Podge to make sure it is sealed. Be careful to allow each side to dry enough so that it doesn’t stick to the newsprint.

5. Now it’s time to trim! Try to follow the edges of the tape and cut straight. At one end, cut a reverse arrowhead shape to give the flag some character.
6. Glue the other straight end of the flag piece to the top of the dowel and curl the piece around it once or so to secure it. I recommend using a hot glue gun since it dries so quickly, but the Mod Podge or other glue can be used to if you’re willing to wait.

7. Now the fun part – create a beautiful wave in your flag by bending it. The wire inside will make this an easy process to do and re-do over and over.


Enjoy creating an impressive colourful collection of dessert flags!
Gaelan is the founder and editor of Uschi&Kay, a Canadian wedding blog for the modern crafty bride. She believes in making things, always learning, and finding inspiration in the most unexpected of places.
Sam is a graphic designer and crafter, the talented lady behind Have&Hold Design, and Uschi&Kay’s DIY expert. She created Have&Hold Design with one simple idea: Life should be celebrated and she applies that notion to everything she makes.
All photo’s by Scarlet O’Neill.


