


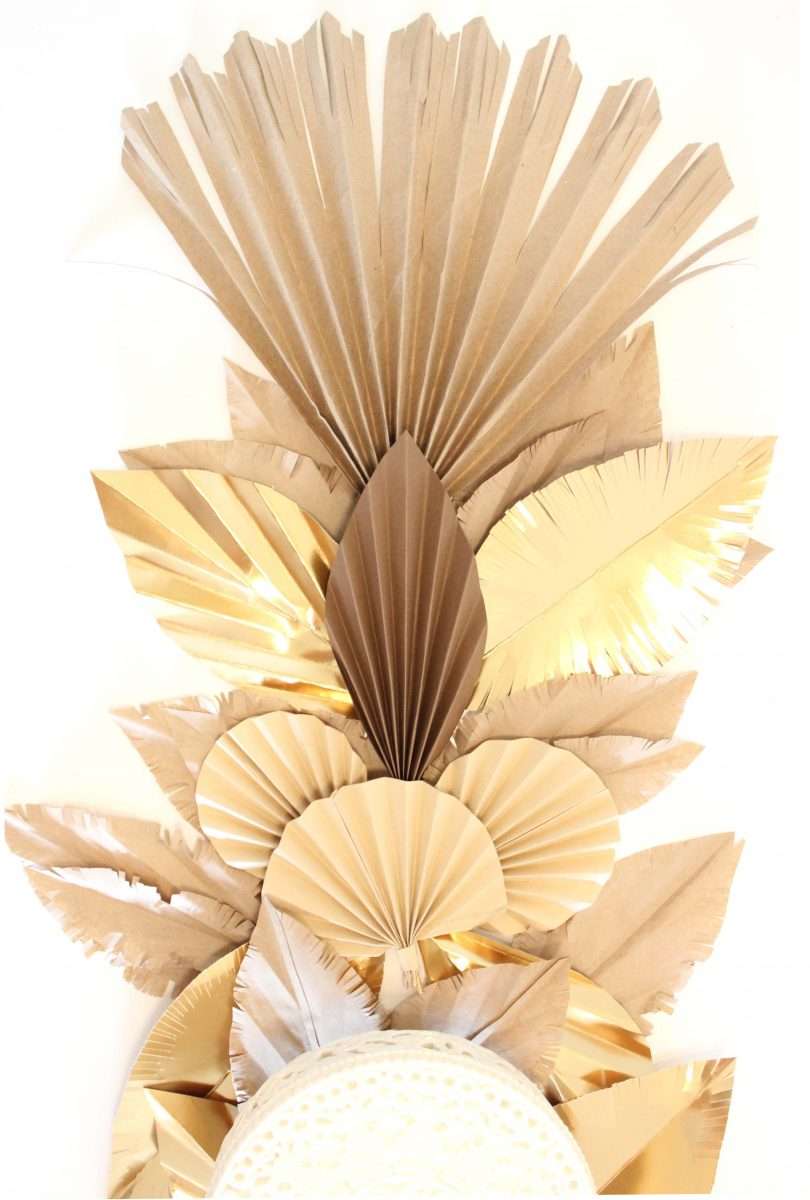
In planning for my festive tablescape I posted yesterday, and as promised, here is the how-to post on making all the different boho-style palm leaves I made for it using items one would find in a grocery store. From coffee filters to brown paper lunch bags, I love how these leaves can be dressed up by adding in gold leaves perfect for a New Year’s Eve dinner party, or made more casual for a Friendsgiving for example.
For the tablescape I made six different styled leaves. Some are using the same basic idea, just riffed by cutting or folding differently which you’ll see. Each one is unique and can be switched up in sizes too, customizing to how you want them. There really is no rule, and they are super easy to make. Also, keep an eye out on my instagram for how-to reels if you need more instruction on how to make them.
There’s also a contest! WIN $50 to buy all your brunching ingredients. Visit addjoy.ca for more details!
Here’s how to make them.

1. Coffee Filter Palm Leaves
You will need:
-Pour-over style coffee filters in different sizes. I used Size 2 and 4
-Bamboo Skewers
-Glue gun or tape

How to make:


Step 1
Place 2 of the same sized filters together. At a 45 degree angle, start to fold (accordian-style) working your way across from one end to the other.
Step 2
Separate the filters. Then place the same sized end of one filter, against the other and glue together using a glue gun. You could also tape, however keep in mind it might not look as finished as a glued one.


Step 3
Then gather the bottom end of the two glued pieces to create a fan-like form. Using an extra filter, cut a strip off one end. Then glue it to cover the end, wrapping it around like a stem. Secure at the end of the strip with more glue (or tape).
Step 4
If you wish to make the fan have a stem, you can now slip in skewer (pointed end) in between the folds of the stem of the fan. It can then be easily placed in a vase to create a bouquet.
2. Lunch Bag Leaves

Making these leaves will leave (no pun intended) you with a little surprise in the form of baby leaves without even trying. When you fold and cut the lunch bags (cutting the shape of larger leaves), once you open them up, you’ll find baby leaves in between (because of the fold already in the lunch bags themeselves). It’s pretty cool, and as you’ll notice, you can make tons of these pretty easily.
You will need:
-Brown paper lunch bags
-Scissors

How to make:


Step 1
You can make these leaves one lunch bag at a time, but I like to make 2 at a time for more efficiency. Grab one or two lunch bags and fold the bottom end downards. Cut off the base (bottom ends). Now fold the lunch bags in half (lengthwise).
Cut the shape of a half a leaf – with the center fold as the center line as your guide. Once cut, open up to reveal all the leaves and open each one up (large ones and the smaller surprise ones that will appear). Separate into two piles of same sizes. Large with large, small with small.


Step 3
Grab one pile (let’s say the large ones first), and fold in half. On the rounded edge now start to fold (accordian-style) at a 45 degree angle. Fold until complete. Then once folded, you can start to cut the fringe of the leaves.
Step 4
Then once folded, you can start to cut the fringe of the leaves. I like to start at the centre and cut right (since I’m right-handed), but if you are left, of course the other way is probably easiest. Then flip and start to cut the fringe on the other rounded half. Open up and ruffle up the fringe a bit to create a more realistic look. Repeat these steps for the smaller leaves.
3. Cardstock Leaves (3 Types)

For these leaves there are three variations. A simple accordian-style folded one, a fringe-ended one and then one that is gathered at the bottom end to create a bit of a stem, that can be left on it’s own, or add a skewer stem to it to add to a bouquet
You will need:
-Any type of 8.5” x 11” card stock paper (I used gold and brown)
-Scissors
-Glue gun or tape

How to make:
Style 1 – Simple Accordian Style Leaf


Step 1
Fold the paper in half (length-wise). From one end to the other, cut the shape of a half a leaf, with the fold as the center of the leaf.
Step 2
With the round edge, start to fold (accordian style) at a 45 degree angle. Fold back and forth till you reach the other end. Open up, and you have a beautiful folded leaf
Style 2 – Fringe Cut


Step 1
Fold the paper in half (length-wise). From one end to the other, cut the shape of a half a leaf, with the fold as the center of the leaf.
Step 2
Then once cut, you can start to cut the fringe of the leaf. As mentioned above, I like to start at the centre and cut right (since I’m right-handed), but if you are left, of course the other way is probably easiest. Then flip and start to cut the fringe on the other rounded half. Open up and ruffle up the fringe a bit to create a more realistic look.

Style 3 – Cardstock Leaf with Stem


Step 1
Fold the paper in half (length-wise). From one end to the other, cut the shape of a half a leaf, with the fold as the center of the leaf. With the round edge, start to fold (accordian style) at a 45 degree angle. Fold back and forth till you reach the other end.
Step 2
Grab the bottom end and squeeze the folds together to create a stem. Glue with a glue gun or tape. Using some scrap paper of the same paper, cut out a 3” inch long by 3/4” to 1” wide strip of paper. Wrap strip around the bottom end stem, glueing to secure.

4. Large Grocery Bag Palms
For these leaves you can make using a large brown grocery bag cut into a square, or kraft paper too.

You will need:
-Brown paper grocery bags (one bag makes two palm leaves) or kraft paper
-Scissors
-Glue Gun or tape
Bambook skewers (optional)
How to make:


Step 1
Cut the bottom end off the paper bag. And then cut each side so they are separate, leaving the sides for scrap. Fold the cut squares diagonally to create a perfect square. Cut off the remaining edge and set aside for scrap. Open up the square, then fold in half. Cut from about 3/4 of the top a round edge on the right and then straight towards the fold.
Step 2
The cut should look like a rounded hill. Then open up the paper again, and folding horizontally accordian style till you reach the other end.


Step 3
Fold together the bottom end and secure with glue or tape. Using a scrap cut 3” long x 1” wide, secure by wrapping it around the base, and securing with glue.
Trim the tops of the fronds at the tips at a 45 degree angle to make them pointy.

Step 4
Open up the folds and then cut down the center of each fold to create the fronds. Continue until all the folds are cut.

Step 5
Then with the scissors, create fringe-like cuts within each frond (approximately 3 or 4 cuts per side.
Step 6
Open up and ruffle a bit to create a beautiful fan-like palm.
To add a stem, insert a bamboo skewer through the stem and glue.

Don’t forget to enter the contest! WIN $50 to buy all your brunching ingredients. Visit addjoy.ca for more details!
